Create the news list page via frontend in Magento 2
Hi guys,
We are happy to introduce you a series of tutorial on how to display data via frontend in Magento 2. This series is quite long then we will divide it into several parts. We will continue using the Tutorial_SimpleNews module in the last post.
This is the summary after we finish this part:
- Create the news list page and list all data with pagination via frontend.
In order to understand this tutorial thoroughly, please review our last tutorials:
- How to create a simple module in Magento 2
- Create a module with custom database table in Magento 2
- How to use Model and Collection in Magento 2
- How to create the configuration via backend for a custom module
- Adding new menu item via backend in custom module
- Grid and Form in Magento 2 Admin Panel (Part 1)
- Grid and Form in Magento 2 Admin Panel (Part 2)
Ok, now let’s get started!
The first, we need to create Helper file, it will contain functions for getting the configuration values:
- Create file: app/code/Tutorial/SimpleNews/Helper/Data.php and insert this following code into it:
<?php

namespace Tutorial\SimpleNews\Helper;

use Magento\Framework\App\Helper\AbstractHelper;
use Magento\Framework\App\Config\ScopeConfigInterface;
use Magento\Framework\App\Helper\Context;
use Magento\Store\Model\ScopeInterface;

class Data extends AbstractHelper
{
   const XML_PATH_ENABLED      = 'simplenews/general/enable_in_frontend';
   const XML_PATH_HEAD_TITLE   = 'simplenews/general/head_title';
   const XML_PATH_LASTEST_NEWS = 'simplenews/general/lastest_news_block_position';

   /**
     * @var \Magento\Framework\App\Config\ScopeConfigInterface
     */
    protected $_scopeConfig;

    /**
     * @param Context $context
     * @param ScopeConfigInterface $scopeConfig
     */
    public function __construct(
       Context $context,
       ScopeConfigInterface $scopeConfig
    ) {
       parent::__construct($context);
       $this->_scopeConfig = $scopeConfig;
    }

   /**
     * Check for module is enabled in frontend
     *
     * @return bool
     */
   public function isEnabledInFrontend($store = null)
   {
      return $this->_scopeConfig->getValue(
         self::XML_PATH_ENABLED,
         ScopeInterface::SCOPE_STORE
      );
   }

   /**
     * Get head title for news list page
     *
     * @return string
     */
   public function getHeadTitle()
   {
      return $this->_scopeConfig->getValue(
         self::XML_PATH_HEAD_TITLE,
         ScopeInterface::SCOPE_STORE
      );
   }

   /**
     * Get lastest news block position (Left, Right, Disabled)
     *
     * @return int
     */
   public function getLastestNewsBlockPosition()
   {
      return $this->_scopeConfig->getValue(
         self::XML_PATH_LASTEST_NEWS,
         ScopeInterface::SCOPE_STORE
      );
   }
}
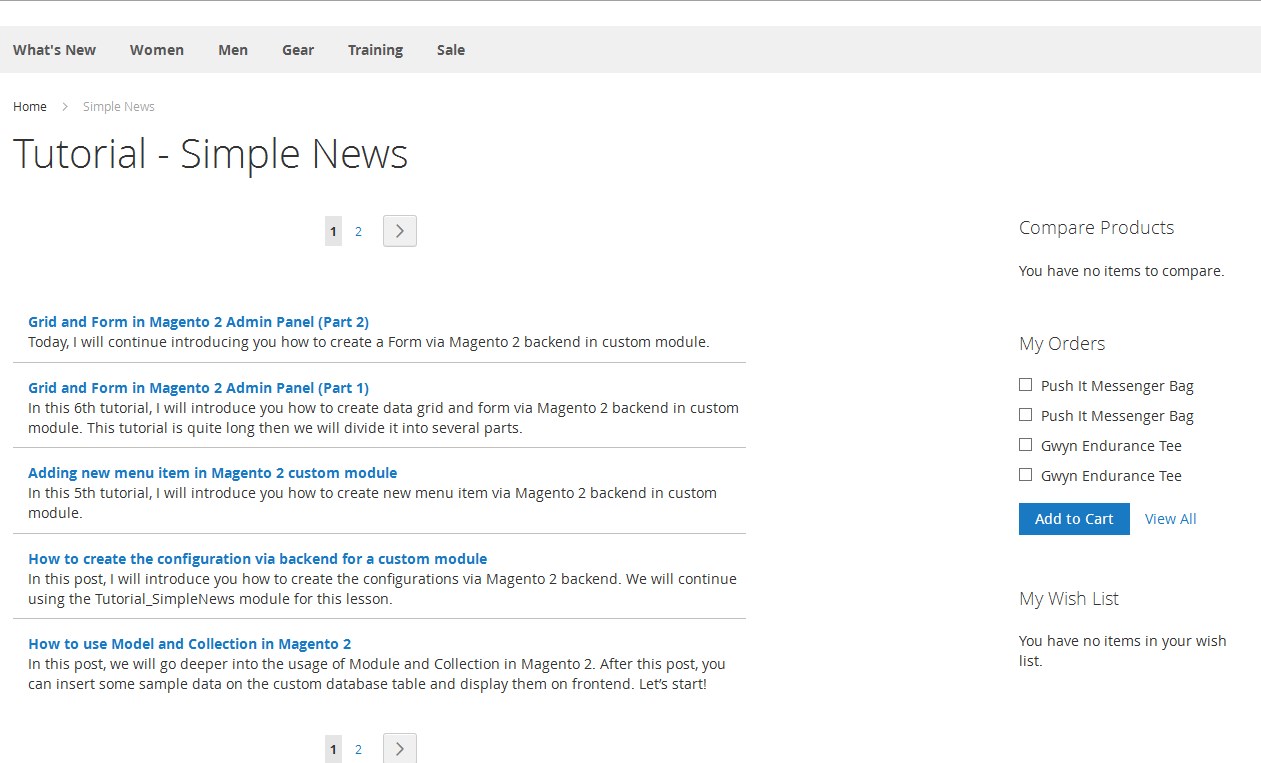
Create the news list page
Step 1: Create layout files.
- Create file: app/code/Tutorial/SimpleNews/view/frontend/layout/news_news.xml (we will use this layout file as default in our module) and insert this following code into it:
<?xml version="1.0" encoding="UTF-8"?>

<page xmlns:xsi="http://www.w3.org/2001/XMLSchema-instance" layout="3columns"
xsi:noNamespaceSchemaLocation="../../../../../../../lib/internal/Magento/
Framework/View/Layout/etc/page_configuration.xsd">
   <head>
      <css src="Tutorial_SimpleNews::css/style.css" />
   </head>
</page>
- Create file: app/code/Tutorial/SimpleNews/view/frontend/layout/news_index_index.xml (this file will declare blocks for using in the news list page) and insert this following code into it:
<?xml version="1.0" encoding="UTF-8"?>

<page xmlns:xsi="http://www.w3.org/2001/XMLSchema-instance" layout="3columns"
xsi:noNamespaceSchemaLocation="../../../../../../../lib/internal/Magento/
Framework/View/Layout/etc/page_configuration.xsd">
    <update handle="news_news" />
    <body>
        <referenceContainer name="content">
            <block class="Tutorial\SimpleNews\Block\NewsList"
                name="tutorial_simplenews_news_list"
                template="Tutorial_SimpleNews::list.phtml" />
        </referenceContainer>
    </body>
</page>
Step 2: Create block file.
- Create file: app/code/Tutorial/SimpleNews/Block/NewsList.php (this file will set the news data collection and declare pagination for them) and insert this following code into it:
<?php

namespace Tutorial\SimpleNews\Block;

use Magento\Framework\View\Element\Template;
use Tutorial\SimpleNews\Model\NewsFactory;

class NewsList extends Template
{
   /**
    * @var \Tutorial\SimpleNews\Model\NewsFactory
    */
   protected $_newsFactory;

   /**
    * @param Template\Context $context
    * @param NewsFactory $newsFactory
    * @param array $data
    */
   public function __construct(
      Template\Context $context,
      NewsFactory $newsFactory,
      array $data = []
   ) {
        $this->_newsFactory = $newsFactory;
        parent::__construct($context, $data);
   }

   /**
     * Set news collection
     */
    protected  function _construct()
    {
        parent::_construct();
        $collection = $this->_newsFactory->create()->getCollection()
            ->setOrder('id', 'DESC');
        $this->setCollection($collection);
    }

   /**
     * @return $this
     */
    protected function _prepareLayout()
    {
        parent::_prepareLayout();
        /** @var \Magento\Theme\Block\Html\Pager */
        $pager = $this->getLayout()->createBlock(
           'Magento\Theme\Block\Html\Pager',
           'simplenews.news.list.pager'
        );
        $pager->setLimit(5)
            ->setShowAmounts(false)
            ->setCollection($this->getCollection());
        $this->setChild('pager', $pager);
        $this->getCollection()->load();

        return $this;
    }

   /**
     * @return string
     */
    public function getPagerHtml()
    {
        return $this->getChildHtml('pager');
    }
}
Step 3: Create template file.
- Create file: app/code/Tutorial/SimpleNews/view/frontend/templates/list.phtml (this file will set the news data collection and declare pagination for them) and insert this following code into it:
<div class="simplenews">
   <?php
      $newsCollection = $block->getCollection();
      if ($newsCollection->getSize() > 0) :
   ?>
      <div class="toolbar top">
         <?php echo $block->getPagerHtml(); ?>
      </div>

      <ul>
         <?php foreach ($newsCollection as $news) : ?>
            <li>
               <div class="simplenews-list">
                  <a class="news-title" href="<?php echo $this->getUrl('news/index/view',
 ['id' => $news->getId()]) ?>"><?php echo $news->getTitle() ?></a>
                  <div class="simplenews-list-content">
                     <?php echo $news->getSummary() ?>
                  </div>
               </div>
            </li>
         <?php endforeach; ?>
      </ul>

      <div style="clear: both"></div>

      <div class="toolbar-bottom">
         <div class="toolbar bottom">
            <?php echo $block->getPagerHtml(); ?>
         </div>
      </div>
   <?php else : ?>
      <p><?php echo __('Have no article!') ?></p>
   <?php endif; ?>
</div>
Step 4: Create controller files.
- Create file: app/code/Tutorial/SimpleNews/Controller/News.php and insert this following code into it:
<?php

namespace Tutorial\SimpleNews\Controller;

use Magento\Framework\App\Action\Action;
use Magento\Framework\App\Action\Context;
use Magento\Framework\App\RequestInterface;
use Magento\Framework\View\Result\PageFactory;
use Tutorial\SimpleNews\Helper\Data;
use Tutorial\SimpleNews\Model\NewsFactory;

class News extends Action
{
   /**
    * @var \Magento\Framework\View\Result\PageFactory
    */
   protected $_pageFactory;

   /**
    * @var \Tutorial\SimpleNews\Helper\Data
    */
   protected $_dataHelper;

   /**
    * @var \Tutorial\SimpleNews\Model\NewsFactory
    */
   protected $_newsFactory;

   /**
    * @param Context $context
    * @param PageFactory $pageFactory
    * @param Data $dataHelper
    * @param NewsFactory $newsFactory
    */
   public function __construct(
      Context $context,
      PageFactory $pageFactory,
      Data $dataHelper,
      NewsFactory $newsFactory
   ) {
      parent::__construct($context);
      $this->_pageFactory = $pageFactory;
      $this->_dataHelper = $dataHelper;
      $this->_newsFactory = $newsFactory;
   }

   /**
     * Dispatch request
     *
     * @param RequestInterface $request
     * @return \Magento\Framework\App\ResponseInterface
     */
    public function dispatch(RequestInterface $request)
    {
       // Check this module is enabled in frontend
      if ($this->_dataHelper->isEnabledInFrontend()) {
         $result = parent::dispatch($request);
          return $result;
      } else {
         $this->_forward('noroute');
      }
    }
}
- Create file: app/code/Tutorial/SimpleNews/Controller/Index/Index.php and insert this following code into it:
<?php

namespace Tutorial\SimpleNews\Controller\Index;

use Tutorial\SimpleNews\Controller\News;

class Index extends News
{
    public function execute()
    {
        $pageFactory = $this->_pageFactory->create();

        // Add title which is got by the configuration via backend
        $pageFactory->getConfig()->getTitle()->set(
            $this->_dataHelper->getHeadTitle()
        );

        // Add breadcrumb
        /** @var \Magento\Theme\Block\Html\Breadcrumbs */
        $breadcrumbs = $pageFactory->getLayout()->getBlock('breadcrumbs');
        $breadcrumbs->addCrumb('home',
            [
                'label' => __('Home'),
                'title' => __('Home'),
                'link' => $this->_url->getUrl('')
            ]
        );
        $breadcrumbs->addCrumb('simplenews',
            [
                'label' => __('Simple News'),
                'title' => __('Simple News')
            ]
        );

        return $pageFactory;
    }
}
Step 5: Create CSS file.
- Create file: app/code/Tutorial/SimpleNews/view/frontend/web/css/style.css and insert this following code into it:
.simplenews > ul {
   list-style: none;
   padding: 0;
}
.simplenews > ul li {
   padding: 10px 5px;
   margin: 0;
   background-color: #fff;
   border-bottom: 1px #c4c1bc solid;
   display: inline-block;
   width: 100%;
}
.simplenews > ul li:last-child {
   border-bottom: none;
}
.simplenews-list {
   float: left;
   position: relative;
   margin-left: 10px;
   width: 100%;
}
.simplenews-list a.news-title {
   font-weight: bold;
}
.simplenews-list a.news-title:hover {
   text-decoration: none;
}
.block-simplenews .block-title {
   margin: 0px 0px 20px;
}
.block-simplenews-heading {
   font-size: 18px;
   font-weight: 300;
}
Ok, it’s done. You can see your result by accessing this url: http://yourdomain.com/news
That’s the first part of this tutorial series. See you again in the next part, in which I will introduce you how to create the news detail page.
Enjoy Magento 2 challenge with MageWorld ‘s tutorials! Follow our facebook fanpage for further discussion.
Related Posts

Grid and Form in Magento 2 Admin Panel (Part 2)

Grid and Form in Magento 2 Admin Panel (Part 1)

Adding new menu item in Magento 2 custom module