Adding new menu item in Magento 2 custom module

Hi guys,
After our 4 Magento 2.0 tutorials, I hope that you guys find them easy to understand and apply to your own situation.
In this 5th tutorial, I will introduce you how to create new menu item via Magento 2 backend in custom module. We will continue using the Tutorial_SimpleNews module in the last post. In order to understand this tutorial thoroughly, please review our last tutorials:
1. How to create a simple module in Magento 2
2. Create a module with custom database table in Magento 2
3. How to use Model and Collection in Magento 2
4. How to create the configuration via backend for a custom module
Ok, now let’s get started!
Step 1: Create menu file.
- Create file: app/code/Tutorial/SimpleNews/etc/adminhtml/menu.xml (Purpose: The menu item of your module will be declared here) and insert this following code into it:
<?xml version="1.0"?>

<config xmlns:xsi="http://www.w3.org/2001/XMLSchema-instance"
xsi:noNamespaceSchemaLocation="../../../Backend/etc/menu.xsd">
    <menu>
        <add id="Tutorial_SimpleNews::main_menu" title="Simple News"
            module="Tutorial_SimpleNews" sortOrder="20"
            resource="Tutorial_SimpleNews::simplenews" />
        <add id="Tutorial_SimpleNews::add_news" title="Add News"
            module="Tutorial_SimpleNews" sortOrder="1" parent="Tutorial_SimpleNews::main_menu"
            action="simplenews/news/new" resource="Tutorial_SimpleNews::manage_news" />
        <add id="Tutorial_SimpleNews::manage_news" title="Manage News"
            module="Tutorial_SimpleNews" sortOrder="2" parent="Tutorial_SimpleNews::main_menu"
            action="simplenews/news/index" resource="Tutorial_SimpleNews::manage_news" />
        <add id="Tutorial_SimpleNews::configuration" title="Configurations"
            module="Tutorial_SimpleNews" sortOrder="3" parent="Tutorial_SimpleNews::main_menu"
            action="adminhtml/system_config/edit/section/simplenews"
            resource="Tutorial_SimpleNews::configuration" />
    </menu>
</config>
Step 2: Create route file.
- Create file: app/code/Tutorial/SimpleNews/etc/adminhtml/routes.xml (Purpose: The router of your module for backend will be declared here) and insert this following code into it:
<?xml version="1.0"?>

<config xmlns:xsi="http://www.w3.org/2001/XMLSchema-instance"
xsi:noNamespaceSchemaLocation="../../../../../../lib/internal/Magento/
Framework/App/etc/routes.xsd">
    <router id="admin">
        <route id="simplenews" frontName="simplenews">
            <module name="Tutorial_SimpleNews" />
        </route>
    </router>
</config>
Step 3: Add role for each menu item.
- Open this file: app/code/Tutorial/SimpleNews/etc/acl.xml and modify the source code into here like this:
<?xml version="1.0"?>

<config xmlns:xsi="http://www.w3.org/2001/XMLSchema-instance"
xsi:noNamespaceSchemaLocation="../../../../../lib/internal/Magento/
Framework/Acl/etc/acl.xsd">
    <acl>
        <resources>
            <resource id="Magento_Backend::admin">
                <resource id="Tutorial_SimpleNews::simplenews" title="Simple News"
                    sortOrder="100">
                    <resource id="Tutorial_SimpleNews::add_news" title="Add News"
                        sortOrder="1" />
                    <resource id="Tutorial_SimpleNews::manage_news" title="Manage News"
                        sortOrder="2" />
                    <resource id="Tutorial_SimpleNews::configuration" title="Configurations"
                        sortOrder="3" />
                </resource>
                <resource id="Magento_Backend::stores">
                    <resource id="Magento_Backend::stores_settings">
                        <resource id="Magento_Config::config">
                            <resource id="Tutorial_SimpleNews::system_config"
                                title="Simple News Section" />
                        </resource>
                    </resource>
                </resource>
            </resource>
        </resources>
    </acl>
</config>
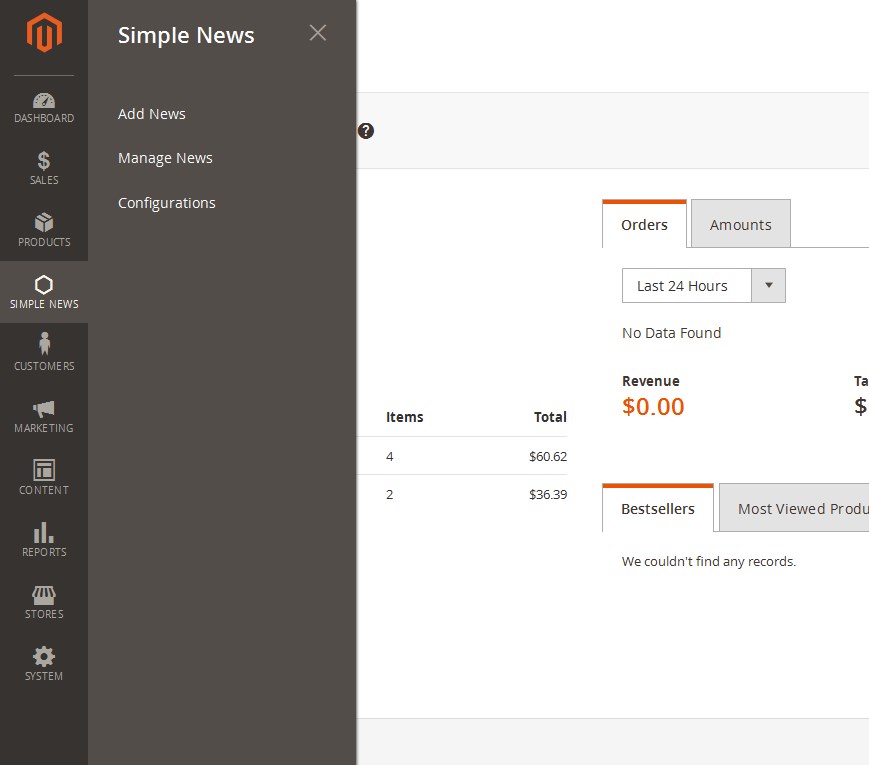
Finally, access to the backend site then clear Magento cache and see your result:
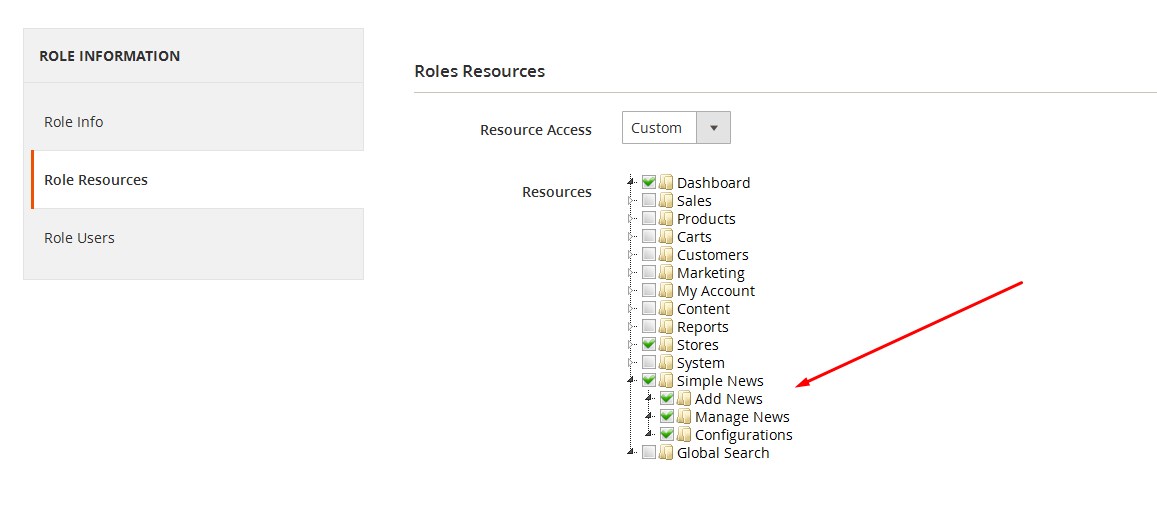
And this is the additional role (System > Permissions > User Roles):
I hope this tutorial is useful for you. In next tutorials, I will introduce you “Grid and Form in Magento Admin Panel”, because the next tutorial will be very long so I will extract it to some parts. See you again in our next Magento 2 tutorial.
Related Posts

How to create the configuration via backend for a custom module

How to use Model and Collection in Magento 2

Create a module with custom database table in Magento 2