How to use Model and Collection in Magento 2

Hi guys,
After introducing 2 first beginning tutorials on Magento 2, which are:
1. How to create a simple module in Magento 2
2. Create a module with custom database table in Magento 2
I hope you can understand and apply easily. In this post, we will go deeper into the usage of Module and Collection in Magento 2. After this post, you can:
- Insert some sample data on the custom database table.
- Create Model, Resource Model and Collection files.
- Get data from the database and display them on frontend.
Let’s start!
1. Insert some sample data on the custom database table
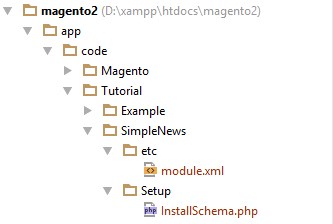
Because we installed Tutorial_SimpleNews module via last post, we need to upgrade this module to insert the sample data.
The directory structure in last post:
Step 1: Create the upgrade data file
- Create file: app/code/Tutorial/SimpleNews/Setup/UpgradeData.php (Purpose: This file will check the module version and insert some sample data into the custom table) and insert this following code into it:
<?php

namespace Tutorial\SimpleNews\Setup;

use Magento\Framework\Setup\UpgradeDataInterface;
use Magento\Framework\Setup\ModuleDataSetupInterface;
use Magento\Framework\Setup\ModuleContextInterface;

class UpgradeData implements UpgradeDataInterface
{
    public function upgrade(
        ModuleDataSetupInterface $setup,
        ModuleContextInterface $context
    ) {
        $setup->startSetup();

        if (version_compare($context->getVersion(), '1.0.1') < 0) {
            // Get tutorial_simplenews table
            $tableName = $setup->getTable('tutorial_simplenews');
            // Check if the table already exists
            if ($setup->getConnection()->isTableExists($tableName) == true) {
                // Declare data
                $data = [
                    [
                        'title' => 'How to create a simple module',
                        'summary' => 'The summary',
                        'description' => 'The description',
                        'created_at' => date('Y-m-d H:i:s'),
                        'status' => 1
                    ],
                    [
                        'title' => 'Create a module with custom database table',
                        'summary' => 'The summary',
                        'description' => 'The description',
                        'created_at' => date('Y-m-d H:i:s'),
                        'status' => 1
                    ]
                ];

                // Insert data to table
                foreach ($data as $item) {
                    $setup->getConnection()->insert($tableName, $item);
                }
            }
        }

        $setup->endSetup();
    }
}
Step 2: Modify the configuration file
- Open the configuration file at app/code/Tutorial/SimpleNews/etc/module.xml then modify setup_version="1.0.0" to setup_version="1.0.1":
<?xml version="1.0"?>

<config xmlns:xsi="http://www.w3.org/2001/XMLSchema-instance"
xsi:noNamespaceSchemaLocation="../../../../../lib/internal/Magento/Framework/
Module/etc/module.xsd">
    <module name="Tutorial_SimpleNews" setup_version="1.0.1" active="true">

    </module>
</config>
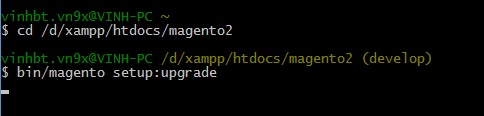
Step 3: Upgrade your module
Open the Command in Windows (or the Terminal in Linux and MAC OS). Go to your Magento root folder and run this command line to install your module:
bin\magento setup:upgrade
This is the result in the tbl_tutorial_simplenews table:

If your module is not installed before, you can see the following way to insert the sample data to the custom database table:
- Create file: app/code/Tutorial/SimpleNews/Setup/InstallData.php (Purpose: This file will insert the sample data into the custom database table when your module is installed) and insert this following code into it:
<?php

namespace Tutorial\SimpleNews\Setup;

use Magento\Framework\Setup\InstallDataInterface;
use Magento\Framework\Setup\ModuleDataSetupInterface;
use Magento\Framework\Setup\ModuleContextInterface;

class InstallData implements InstallDataInterface
{
    public function install(
        ModuleDataSetupInterface $setup,
        ModuleContextInterface $context
    ) {
        $setup->startSetup();

        // Get tutorial_simplenews table
        $tableName = $setup->getTable('tutorial_simplenews');
        // Check if the table already exists
        if ($setup->getConnection()->isTableExists($tableName) == true) {
            // Declare data
            $data = [
                [
                    'title' => 'How to create a simple module',
                    'summary' => 'The summary',
                    'description' => 'The description',
                    'created_at' => date('Y-m-d H:i:s'),
                    'status' => 1
                ],
                [
                    'title' => 'Create a module with custom database table',
                    'summary' => 'The summary',
                    'description' => 'The description',
                    'created_at' => date('Y-m-d H:i:s'),
                    'status' => 1
                ]
            ];

            // Insert data to table
            foreach ($data as $item) {
                $setup->getConnection()->insert($tableName, $item);
            }
        }

        $setup->endSetup();
    }
}
Next, repeat the step 3 and see the result.
2. Create Model, Resource Model and Collection files
We need to create these files to insert, update, delete and get data in the database.
- Create model file: app/code/Tutorial/SimpleNews/Model/News.php and insert this following code into it:
<?php

namespace Tutorial\SimpleNews\Model;

use Magento\Framework\Model\AbstractModel;

class News extends AbstractModel
{
    /**
     * Define resource model
     */
    protected function _construct()
    {
        $this->_init('Tutorial\SimpleNews\Model\Resource\News');
    }
}
- Create resource model file: app/code/Tutorial/SimpleNews/Model/Resource/News.php and insert this following code into it:
<?php

namespace Tutorial\SimpleNews\Model\Resource;

use Magento\Framework\Model\Resource\Db\AbstractDb;

class News extends AbstractDb
{
    /**
     * Define main table
     */
    protected function _construct()
    {
        $this->_init('tutorial_simplenews', 'id');
    }
}
- Create collection file: app/code/Tutorial/SimpleNews/Model/Resource/News/Collection.php and insert this following code into it:
<?php

namespace Tutorial\SimpleNews\Model\Resource\News;

use Magento\Framework\Model\Resource\Db\Collection\AbstractCollection;

class Collection extends AbstractCollection
{
    /**
     * Define model & resource model
     */
    protected function _construct()
    {
        $this->_init(
            'Tutorial\SimpleNews\Model\News',
            'Tutorial\SimpleNews\Model\Resource\News'
        );
    }
}
3. Get data from the database and display them at the frontend
Finally, we will finish this lesson with getting the data and display them at the frontend.
- Create route file: app/code/Tutorial/SimpleNews/etc/frontend/routes.xml and insert this following code into it:
<?xml version="1.0"?>

<config xmlns:xsi="http://www.w3.org/2001/XMLSchema-instance"
xsi:noNamespaceSchemaLocation="../../../../../../lib/internal/Magento/Framework/
App/etc/routes.xsd">
    <router id="standard">
        <route id="news" frontName="news">
            <module name="Tutorial_SimpleNews" />
        </route>
    </router>
</config>
- Create controller file: app/code/Tutorial/SimpleNews/Controller/Index/Index.php and insert this following code into it:
<?php
namespace Tutorial\SimpleNews\Controller\Index;
use Magento\Framework\App\Action\Action;
use Magento\Framework\App\Action\Context;
use Tutorial\SimpleNews\Model\NewsFactory;
class Index extends Action
{
/**
* @var \Tutorial\SimpleNews\Model\NewsFactory
*/
protected $_modelNewsFactory;
/**
* @param Context $context
* @param NewsFactory $modelNewsFactory
*/
public function __construct(
Context $context,
NewsFactory $modelNewsFactory
) {
parent::__construct($context);
$this->_modelNewsFactory = $modelNewsFactory;
}
public function execute()
{
/**
* When Magento get your model, it will generate a Factory class
* for your model at var/generaton folder and we can get your
* model by this way
*/
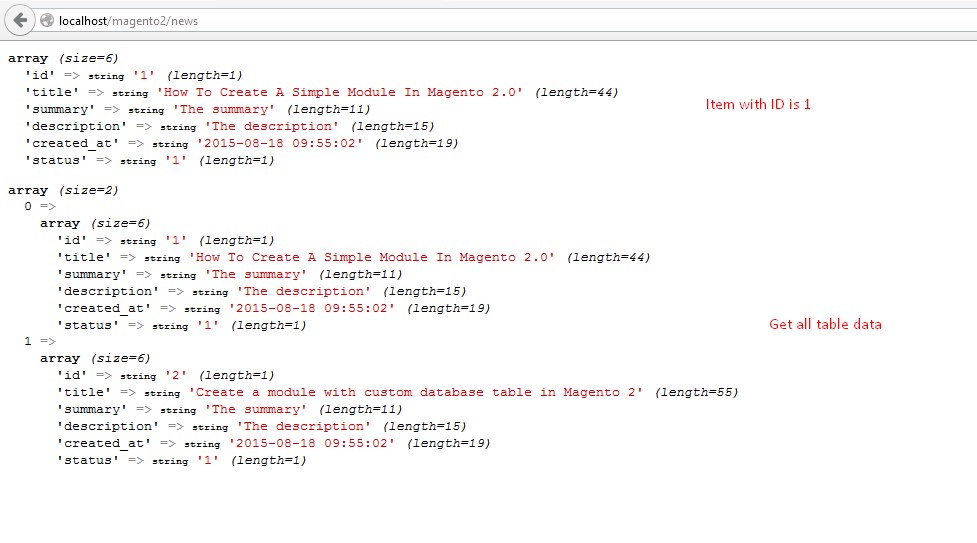
$newsModel = $this->_modelNewsFactory->create();
// Load the item with ID is 1
$item = $newsModel->load(1);
var_dump($item->getData());
// Get news collection
$newsCollection = $newsModel->getCollection();
// Load all data of collection
var_dump($newsCollection->getData());
}
}
Finally, clear the Magento cache then access with url http://localhost/magento2/news/ and this is the result:
Finally, we have finished this tutorial and I hope it’s useful for you. In next tutorials, I will introduce you “How to create the configuration via backend for a custom module”. See you again in our next Magento 2 tutorial.
If you have any problem or ideas don’t hesitate to discuss with us through our Facebook fanpage.
Related Posts

Create a module with custom database table in Magento 2
How to create a simple module in Magento 2.0