Lesson 3 - The Model, collections & layout
In the last lesson, I have introduced you how to create and call a model. In this third lesson, I will show you about collections and layout displays.
CALLING MODEL & COLLECTIONS
In the second lesson, in the section CREATE THE MODEL, we have declare a model and collections for the SimpleNews module.
In order to call a model, we call “getModel” function.
Mage::getModel('simplenews_model/news')
simplenews_model is declared in file app/code/local/MW/SimpleNews/etc/config.xml. (Click to see file config.xml in full)
<models>
    <simplenews_model>
        <class>MW_SimpleNews_Model</class>
        <resourceModel>simplenews_model_mysql4</resourceModel>
    </simplenews_model>
    …
</models>
After you call getModel, you can:
- Take a record directly according to ID (number): Mage::getModel('simplenews_model/news')->load(ID);
Take a list of records: Mage::getModel('simplenews_model/news')->getCollection();. This is similar as you run the query: SELECT * FROM `simplenews_news
DISPLAY DATA
If you follow the second lesson, you run this URL:
http://{youdomain|localhost}/magento/index.php/news/index/index
You will receive only one string: Hello World!
So where are the header, top, left, main and footer? - Currently, they haven’t been configured and set up.
CONFIGURE THE MODULE LAYOUT
In order to configure the module, you create a file mw_simplenews.xml according to the link:
app/design/frontend/default/default/layout/mw_simplenews.xml
Note:
-
default/defaultin this lesson, I am using Magento Version 1.8.x, so this path is applied for version 1.6 - 1.8. In case you use custom theme, you need to change the link so that the system can load file module layout.
The content of the filemw_simplenews.xml (Click to see this file in full):

Screen: less3.1
Explanation:
- (1) simplenews_router_index_index: You need to pay attention to this tag because this tag is used to define controller and action to call itself. In which, simplenews_router is configured in config.xml file(Click here to see the config.xml file in full):
<frontend> <routers> <simplenews_router> <use>standard</use> <args> <module>MW_SimpleNews</module> <frontName>news</frontName> </args> </simplenews_router> </routers> </frontend> -
In addition, regarding the <reference name="content"> and the blog tag inside, I will introduce in advanced section of the next lesson :).
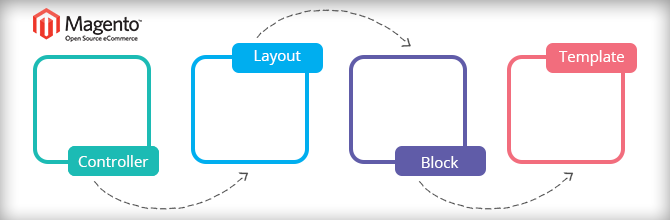
HOW TO WORKS
After configuring the module layout, you return to edit file app/code/local/MW/SimpleNews/controllers/IndexController.php
public function indexAction(){
    $collection = Mage::getModel('simplenews_model/news')->getCollection();

    $this->loadLayout();
    $this->getLayout()->getBlock('news_index_index')->assign('collection', $collection);
    $this->renderLayout();
}
Explanation:
- $this->loadLayout();: After you call this function, its task is to load the corresponding tag in layout file mw_simplenews.xml. As you can see inScreen: less3.1.
- $this->getLayout()->getBlock('news_index_index')->assign(...): In the image Screen: less3.1 that i marked as number 2, getBlock here is the name that i defined for that block.The purpose of this line is that I will push variables and data to file.
CREATE FILE TEMPLATE
Next, we will create template file to display the data for controller.
As the image Screen: less3.1, according to the number 3 that i marked, we will create a template file to your current theme. Here I use default theme of Magento Version 1.8.x
Then the path is: app/design/frontend/default/default/theme/mw_simplenews/list/index.phtml. The file content simply is:
<h3>List news</h3>
<ul>
<?php foreach($collection->getData() as $new):?>
    <li>
        <!-- title, desc, category_id, status -->
        <?php echo $new['title'];?>
    </li>
<?php endforeach;?>
</ul>
Ok, run URL http://{youdomain|localhost}/magento/index.php/news/index/index and see how it works.
In the next lesson, I will show you more advanced Magento tutorials about block and layout.
Related Posts
Lesson 2 - The model and the database