Create a module with custom database table in Magento 2

Hi guys,
It is Nicolas Bui here and today, we will continue with our Magento 2 tutorial series. After the first tutorial on how to create a simple module in Magento 2, we hope you can create a module by yourself easily. If you still have problem, don’t hesitate to discuss with us through our facebook fanpage. In this second blog post, I will introduce you how to create a module with custom database table in Magento 2.
Let’s do it!
We will create a new table in the database of Magento 2 with the structure as follows:
Table name: tutorial_simplenews

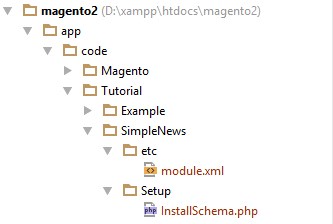
Step 1: Create a new module (Tutorial_SimpleNews) with the following structure:
Step 2: Create configuration file.
- Create file: app/code/Tutorial/SimpleNews/etc/module.xml (Purpose: This file will declare your module) and insert this following code into it:
<?xml version="1.0"?>
<config xmlns:xsi="http://www.w3.org/2001/XMLSchema-instance" xsi:noNamespaceSchemaLocation="
../../../../../lib/internal/Magento/Framework/Module/etc/module.xsd">
    <module name="Tutorial_SimpleNews" setup_version="1.0.0" active="true">

    </module>
</config>
Step 3: Create the installation file.
- Create file: app/code/Tutorial/SimpleNews/Setup/InstallSchema.php (Purpose: This file will declare and create your custom table) and insert this following code into it:
<?php

namespace Tutorial\SimpleNews\Setup;

use Magento\Framework\Setup\InstallSchemaInterface;
use Magento\Framework\Setup\ModuleContextInterface;
use Magento\Framework\Setup\SchemaSetupInterface;
use Magento\Framework\DB\Ddl\Table;

class InstallSchema implements InstallSchemaInterface
{
    public function install(SchemaSetupInterface $setup, ModuleContextInterface $context)
    {
        $installer = $setup;
        $installer->startSetup();

        // Get tutorial_simplenews table
        $tableName = $installer->getTable('tutorial_simplenews');
        // Check if the table already exists
        if ($installer->getConnection()->isTableExists($tableName) != true) {
            // Create tutorial_simplenews table
            $table = $installer->getConnection()
                ->newTable($tableName)
                ->addColumn(
                    'id',
                    Table::TYPE_INTEGER,
                    null,
                    [
                        'identity' => true,
                        'unsigned' => true,
                        'nullable' => false,
                        'primary' => true
                    ],
                    'ID'
                )
                ->addColumn(
                    'title',
                    Table::TYPE_TEXT,
                    null,
                    ['nullable' => false, 'default' => ''],
                    'Title'
                )
                ->addColumn(
                    'summary',
                    Table::TYPE_TEXT,
                    null,
                    ['nullable' => false, 'default' => ''],
                    'Summary'
                )
                ->addColumn(
                    'description',
                    Table::TYPE_TEXT,
                    null,
                    ['nullable' => false, 'default' => ''],
                    'Description'
                )
                ->addColumn(
                    'created_at',
                    Table::TYPE_DATETIME,
                    null,
                    ['nullable' => false],
                    'Created At'
                )
                ->addColumn(
                    'status',
                    Table::TYPE_SMALLINT,
                    null,
                    ['nullable' => false, 'default' => '0'],
                    'Status'
                )
                ->setComment('News Table')
                ->setOption('type', 'InnoDB')
                ->setOption('charset', 'utf8');
            $installer->getConnection()->createTable($table);
        }

        $installer->endSetup();
    }
}
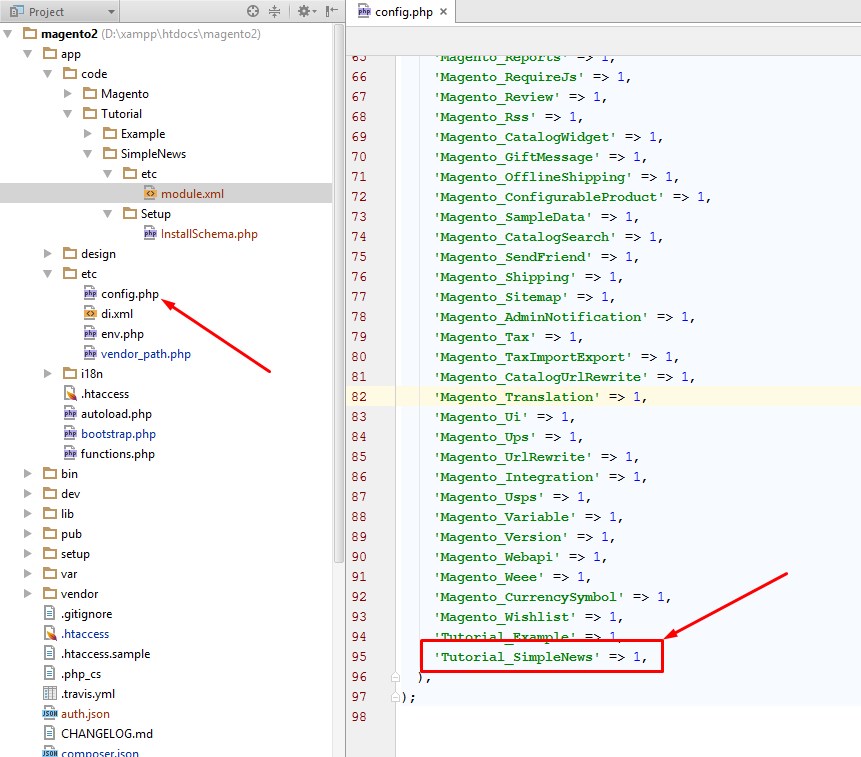
Step 3: Activate the module.
We will active this module by opening app/etc/config.php file then add this line into it:
Next, open the Command in Windows (or the Terminal in Linux and MAC OS). Go to your Magento root folder and run this command line to install your module:
bin\magento setup:upgrade

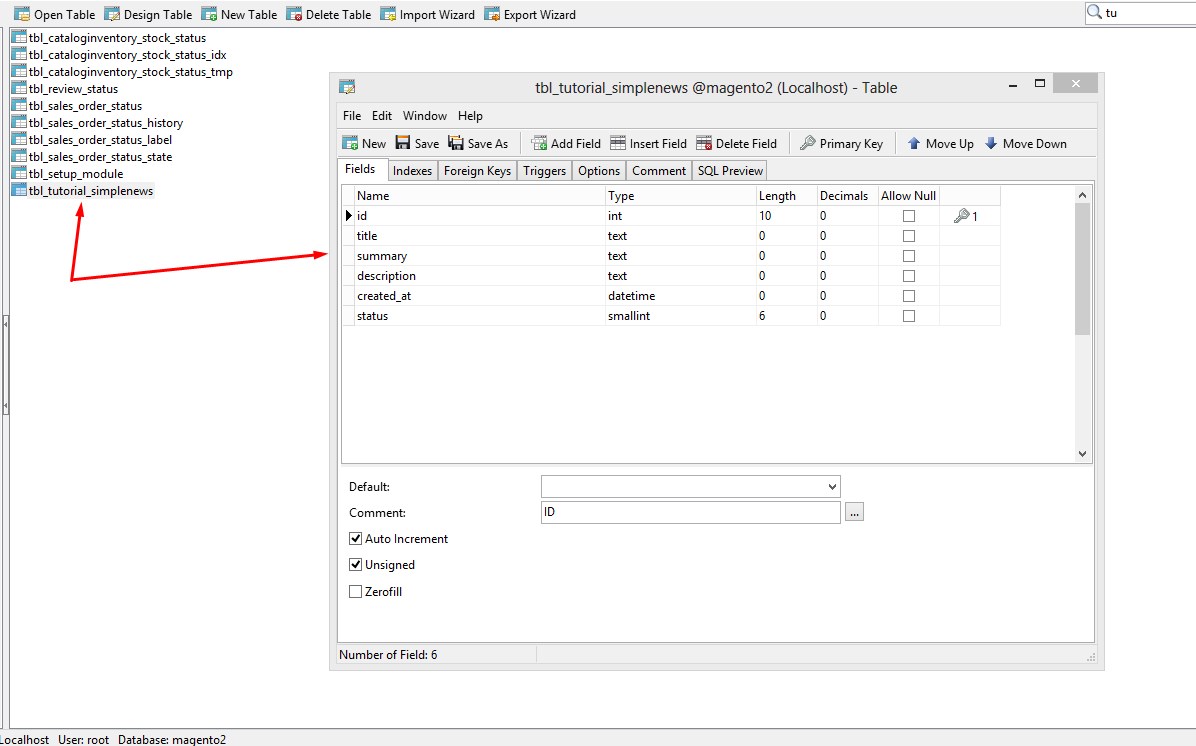
Finally, let’s check your database and you will see the tutorial_simplenews table created successfully:
I hope this tutorial is useful for you and see you again in our next Magento 2 tutorial, which is “How to use Model & Collection in Magento 2”.
If you have any problem or ideas don’t hesitate to discuss with us through our Facebook fanpage.
Related Posts
How to create a simple module in Magento 2.0
Lesson 3 - The Model, collections & layout
Lesson 2 - The model and the database